The
image below shows what the new G8 servers new design looks like in reality.

In
the new Generation 8 HP servers the popular SmartStart DVD has been
discontinued and been replaced with a server built in utility that can be
activated during the initial POST self check screen by pressing the F10 button,
called Intelligent Provisioning.
Below is a screenshot of the option:
Below is a screenshot of the option:

Then
the configuration wizard starts for preparing the RAID configuration and
choosing the options required for the OS. We click on Configure and Install.

At
this point we are given the option of the System Profile where we choose weather
it's a server that will need high performance or optimize for power efficiency,
Maximum Performance is chosen for most corporate environments. Then if
DHCP enabled internet connection is available you can choose to Update
System Software before OS Install otherwise you can do this later on.
Lastly on the Array Configuration option choose Customize to give us a
chance to work on the Advance Configuration Utility ACU and configure the RAID
array as we like rather than use the default option.

The Array Configuration Utility will pop up next, where we need to choose from the available RAID controller devices the controller that we have installed as shown below.

Depending on the requirements of the purpose of the server the relevant configuration is created, in corporate environment and depending on the number of disks available a RAID 1 configuration with 2 drives is very common to host the OS, while a RAID 5 configuration is usually implemented for the DATA partition of the server.

In this example I have created and chosen a RAID 1 partition comprised by 2 x 300GB drives to install the OS on.The standard option on the next step would be the Recommended where apart from the installation of the OS it also installs the drivers and utilities that the SmartStart DVD used to install for the selected OS, and the Source Media would be Disc as installation is done via the DVD drive.

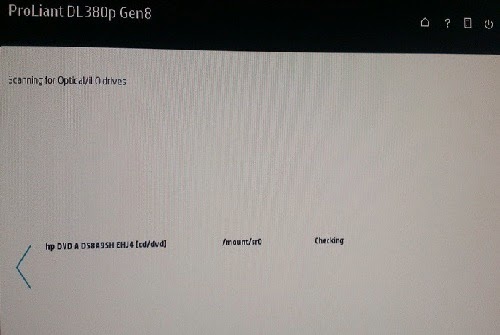
Checking the DVD disc for integrity is following:
The OS selection is the next step where we choose Windows 2008 R2 Enterpise x64 Edition.

Next
is the final Review page where the configuration is applied always giving the
Warning that all data on the current portion will be lost as this is a clean
install of the OS, click on Next.

[ If your internet connection is up and running this will download and install the latest firmware updates.]

The
partition creation takes over next and copying of the window OS files locally
to the server is performed in this step, as well as the full Windows 2008 R2
installation.

Once installation of the OS is complete you will be forwarded to the screenshot below where the installation of the HP Management Utilities takes place, as well as all the drivers needed for the OS. This process could take a while so be patient and let it do its thing without interruption.

Lastly
after a reboot you will see the normal windows desktop initial screen which may
also require a few reboots in order to complete the installation of the various
drivers and software.

***Now
you are ready to start installing the software related to the operation of the
server. Make sure you install the latest Windows updates.
No comments:
Post a Comment