Thursday, January 29, 2015

Using BanglaLion Wimax modem on Linux Ubuntu

Important File Need to Download:
For operate Banglalion modem in Linux you have to download wimax-on-linux-1.0.0 package from below link. Its totally free.
For ZTE AX226 or WU216 you need to download banglalion-wimax-for-linux-1.0.0-ax226-wu216 file and for old U211 download banglalion-wimax-for-linux-1.0.0-u211 file.

Links:
 For Beceem Download 

https://code.google.com/p/wimaxcmgui/downloads/detail?name=beceem-control-panel.exe
 or
https://code.google.com/p/wimaxcmgui/downloads/list

Modes ID Changing Software link for ZTE AX226: 

http://code.google.com/p/wimaxcmgui/downloads/detail?name=beceemcontrol-
panel.exe


GNU/GPL version 3 License copy LINK for this Software: 

http://www.gnu.org/licenses/gpl-3.0.txt

System Requirement:

1) Ubuntu 11.04 and upper version (Only 32-bit)
2) Kernel 2.6.38-8 and upper version.
3) Network Manager.
4) U221, AX226 or WU216 WiMAX USB Modem.

Procedure :

1st Step (You don't need to follow this Step if your modem is not the ZTE AX226 model)
If your device is AX226 then using Beceem Software you have change the device ID(download link given in upper section). By doing this procedure you will able to use your modem in both Linux and windows operating system.

  • First download the Beceem software and install it.
  • Plugin your modem and open Beceem Control Panel.
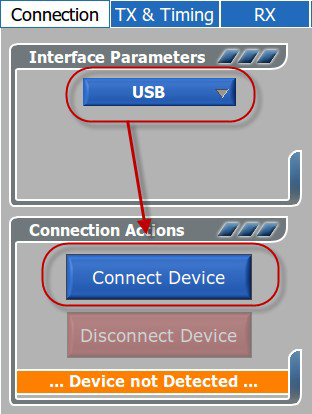
  • Set the Interface Parameter at "USB" and click below "Connect Device" b
    utton.
  •  
  • Then go to DSD tabe as shown in figure & then from EDIT Tools click to "Modify USB Autoinit Data". 
  • Now click "Read from Device" and you will get a panel like shown below figure.
  • Your current info should show Vendor ID = 19D2 and Product ID = 0172.
    These are the values needed to make the modem work on windows or on Mac. To make this modem workable with linux, we need to change these IDs. Be very careful while doing this as it may corrupt your modem if not done correctly.
  • Carefully change the Vendor ID to 198F and Pr. ID to 0220.
  • Then click "Write to Device" and wait some time.
  • After completing this process, close the software.
  • Unplug the device - your modem is now ready to be recognized by ubuntu.
  • REMEMBER THAT: you will have to reset the Vendor ID and Product ID back to the default values to make it work on Windows again. But be very careful while doing it as it may corrupt your modem if not done correctly.
 

2nd Step (For Other Devices Except ZTE AX226)
  • Boot up in linux while the modem is disconnected from your machine... I used Ubuntu 12.04 without having the BanglaLion modem inserted into the USB.
  • Download the modem setup files for linux. Choose the appropriate download file based on the model of the device that you are using.
  • Make sure you download the file into the Home folder (or in desktop) of your Ubuntu OS. Sometimes, the partition permissions can cause trouble with the installation if you install from some other partition.
  • Right click on the downloaded file and click properties.
  • Make sure the "Allow executing" / "Is executable" check-box is turned on.
  • Then close the properties box.
  • Make sure your modem is NOT connected to your PC yet.
  • Now double-click the installer file and click on "Run" if prompted. You should see some terminal code executing and returning a success response. 
  • After that, open your ubuntu dash and search for "WiMAX CM GUI". You should see an app launcher icon. Open the app.
  • You should notice it that the app shows there is no connected device. 
  • Now connect your Banglalion WiMAX modem and the status should now show that a device has been detected.
  • Then go over to the "Account" tab and press the "Find it" button to fill in your modem's MAC address automatically.
  • Insert the username and password that you received from your banglalionwimax provider. 
  • Save that profile for future use.
  • Click activate to activate the profile into the app.
  • Then go over to the "Status" tab and click on "Connect"... wait for some time.
  • Your Banglalion connection should now be established and recognized as a Wired Connection by Ubuntu.


 Problems : 

  • 64 bit OS is not supported. 
  • will not run on kernel older then 2.6.38
  • will not run without changing device id on ZTE AX226.
Reference Sources:
  1. http://www.techtunes.com.bd/linux/tune-id/89277
  2. http://thirsty2know.blogspot.com/2012/04/use-banglalion-ax226-in-ubuntu-32bit.html

10 Useful Interview Questions and Answers on Linux Commands

Linux command Line and the interaction of users with Linux Shell with Linux Commands is the most wonderful part of Linux and is one of the most widely topic from interview point. Here in this article we are coming up with 10 wonderful questions that are important from the interview perspective and will surely add to yours knowledge base.


1. How will you suspend a running process and put it in the background?
Answer : In order to suspend a running process/job and put it in the background we need to use the key combination Ctrl+z.
2. What are the minimum number of partitions required to install Linux and How will you check boot messages?
Answer : The /root partition alone is sufficient to perform the whole task however minimum three partitions are recommended to install Linux. These are root, boot and swap. An IDE Hard Disk Drive supports up to 63 partitions and SCSI Hard Disk Drive supports up-to 15 partitions.
In order to check boot messages we need to use cat or dmesg commands as shown below.
# cat /var/log/messages
OR
# dmesg

3. Name the Daemon responsible for tracking System Event on your Linux box?
Answer : The Daemon ‘syslogd’ is responsible for tracking system information and stores the tracked logs in specific log files.
4. What are the minimum requirements to run command ‘fsck’ on root partition?
Answer : The /root partition must be mounted as read only mode and not read-write to execute fsck command on root partition.
5. How to copy /home directory hierarchically to another directory. How will you do it?
Answer : A Linux command ‘cpio’ comes to rescue here. The ‘cpio’ utility copies files and directories hierarchically over another location.
6. How will you automate the rotation of logs in Linux?
Answer : A Linux command ‘logrotate’ comes to rescue when it comes to automate the logs in Linux.
7. How to know who has scheduled the job?
Answer : The Linux command ‘at’ along with switch ‘-l’ is all we need to use in order to check who has scheduled the job.
8. How to view the contents of the tar ball without extracting it. How will you do this?
Answer : We need to use command ‘tar’ with options ‘-tvf’. The options ‘t’ (Display the contents), ‘v’ (Verbose), ‘f’ (files).
9. What is page Fault and how it happens?
Answer : A program request for some data and if it is not available in the Memory it is called as page fault. Page Fault occurs as a result of program shutdown.
10. What are return codes in program?
Answer : A return code is the feature of Shell. The result of return code shows the status of a program. A successful program after execution returns ‘0’, && can be used to prioritize which application will be executing first.

Wednesday, January 28, 2015

RIP Equal Cost Load Balancing

Purpose:  Master RIP Equal Cost Load Balancing configuration, learn how to modify load balancing path.

Requirement:  Based on connectivity RIP should do load balancing.


Steps:

Step 1: Finish the basic IP configuration according to the diagram, and test connectivity.

Step 2: Enable RIP on 3 routers

R1(config)#router rip
R1(config-router)#version 2
R1(config-router)#no auto-summary
R1(config-router)#network 13.0.0.0
R1(config-router)#network 12.0.0.0
R2(config)#router rip R2(config-router)#version 2
R2(config-router)#no auto-summary
R2(config-router)# network 23.0.0.0
R2(config-router)# network 12.0.0.0
R2(config-router)# network 2.2.2.0
R3(config)#router rip
R3(config-router)#version 2
R3(config-router)#no auto-summary
R3(config-router)# network 13.0.0.0
R3(config-router)# network 23.0.0.0

Step 3: Check route table of R2 to see whether there are 2 routes for network 13.0.0.0

Step 4: If you want to enable packet based load balance, You need to disable Cisco CEF first.
R2(config)#interface s1
R2(config-if)#no ip cef
R2(config-if)#no ip route-cache
R2(config)#interface s0
R2(config-if)#no ip cef
R2(config-if)#no ip route-cache

Step 5: “ping 13.0.0.1 source 2.2.2.2″ and “debug ip packet” to check RIP Equal Cost Load Balancing feature.

Step 6: Change the maximum load balancing number of RIP to 6
Use show ip protocols we can see Maximum path: 4
Change the number to 6:
R2(config)#router rip
R2(config-router)#maximum-paths 6

**Tips: Before IOS 12.3 the maximum number is 6, after 12.3 it could be up to 16.

Sunday, January 25, 2015

Converting a Linux PC to Router

Here is good news for you, if you have an old PC hardware. Don’t throw it away. It can eliminate the need of purchasing a router for your small network.

A Linux system could work as a powerful router in small network. You only have to install a Linux Distro on your PC/Laptop and install an extra NIC if you only have one. It only takes two minutes to configure a Linux machine as a router. This blog show you how to configure Linux as a router in few simple steps.
  
Prerequisites
1. A Linux system with two or more interfaces.
2. Internet Connection.
3. IP tables basic knowledge. (need not to be a geek)
4. Another system on LAN for testing.
5. Dnsmasq. (if a DHCP is not working in your LAN environment)

Topology


Steps
1. Configuring ip address
edit network connection setting from the setting menu


2. Enable ip forwarding
Run this command in terminal
sudo echo 1 /proc/sys/net/ipv4/ip_forward
This will give output as
1 /proc/sys/net/ipv4/ip_forward

To make the change permanent so after next boot you don't have to enable ip forwarding again. Edit
/etc/systcl.conf
and uncomment the line
net.ipv4.ip_forward=1


3. For enabling NATing issue the command: 
sudo iptables -t nat -A POSTROUTING -o eth0 -j MASQUERADE

4. Configuring firewall to allow inbound and outbound transit traffic by the follwoing commands: 
sudo iptables -A FORWARD -i eth1 -o eth0 -j ACCEPTsudo iptables -A FORWARD -i eth0 -o eth1 -m state --state RELATED,ESTABLISHED -j ACCEPT

5. Configuring dnsmasq
Dnsmasq is a lightweight dns cum dhcp/tftp server and it is easily configurable. Just uncomment the line
#dhcp-range=192.168.0.50,192.168.0.150,12h

Here u can change the range with your choice of subnet, no need to change other things dnsmasq will automatically provide default router and DNS server ip address as the ip of machine it is running on.

(NOTE: if you have a DHCP serer already in your environment you need not to follow this step just configure your DHCP to provide gateway ip address as the ip address of LAN facing interface of Linux machine or set "option 3 " as the ip address of Linux machine.)

6. Test the connectivity to internet on test pc


(NOTE: The interface used here i.e. eth0 & eth1 could be different on your machine i.e. the machine can be connected to internet via a PPP (point to point) or wireless connection, so make change in configuration according to your need.)

STP (Spanning Tree Protocol)


It prevents a network from frame looping by putting some interfaces in forwarding state & some interfaces in blocking state.
Whenever two or more switches are connected with each other for redundancy purpose loop can occur. STP Protocol is used to prevent the loop. STP is layer 2 Protocol & by default it is enabled on switches.

If we don’t use STP, these problems will occur on the network:
(i) Broadcast Storms
(ii) High Processor Utilization
(iii) Mac Table instability
(iv) Multiple Frame Transmission

STP Tasks
1. Elect Root Bridge
2. Elect Designated Port
3. Elect Root Port
Root Bridge- A switch which has best bridge ID (Lower Best)
Bridge ID is a combination of Switch priority and its MAC addresses. It is 8 bytes ID. It contains 2 bytes priority Plus 6 bytes MAC.


Switches by default Priority is 32768.
We can change the priority between 0-65535.
MAC- Each Switch has a supervisor engine. Supervisor engine has a MAC pool, the pool contain 1024 MAC addresses. When a switch wants to create Bridge ID, it borrows MAC from MAC Pool.

Requirements for Root Bridge
1. Lower Bridge Priority
2. Lower Mac Address.
(Note: Rood Bridge Always Generates 0 Cost BPDU.)

Requirements for DP and RP
1. Lower Bridge ID (Only for DP, Between Root & Non Root)
2. Lower Cost | For DP & RP
3. Lower Sender Bridge ID | B/W Root – Non Root
4. Lower Sender Port Priority | Non Root – Non Root
5. Lower Sender Port ID
(Note: All Ports of Root Bridge are DP.
Every non root bridge must have at least one root port.)